Devlog #3 - Training My Drone: ML-Agents Setup
When designing a Multi-Agent Reinforcement Learning (MARL) environment, the choice of simulation platform significantly impacts development speed. Unity provides an ML-Agents toolkit built for reinforcement learning, making it more suitable for MARL tasks. Unity ML-Agents include built-in support for multi-agent systems, curriculum learning, imitation learning and reward shaping. In addition, Unity ML-Agents is designed to work seamlessly with Python-based machine learning libraries like PyTorch and TensorFlow.
Setting up an environment
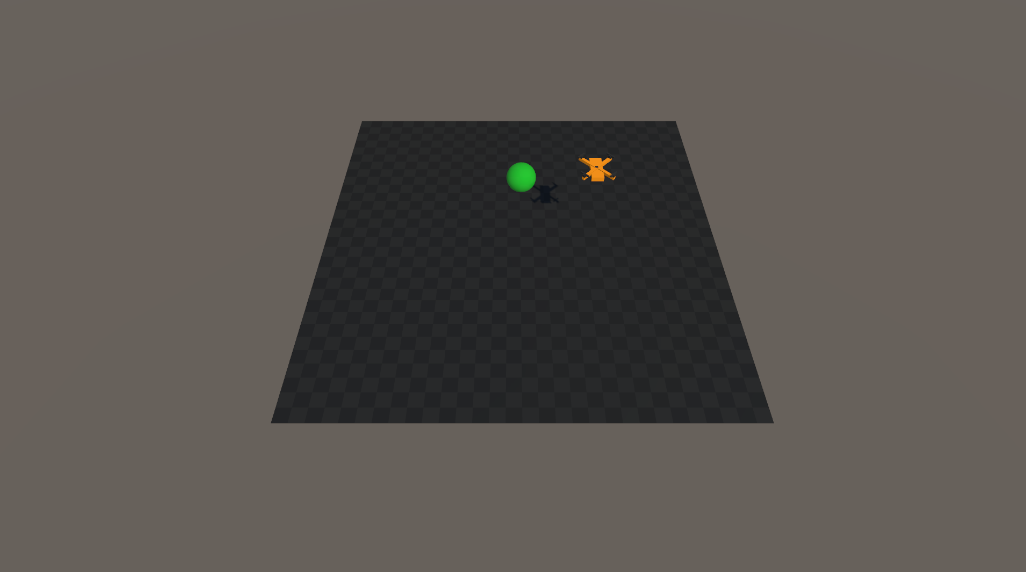
My first task was to create an environment for the agent to train in. I added the drone and made a target which the drone is going to be trained to find.
Setting up the agent
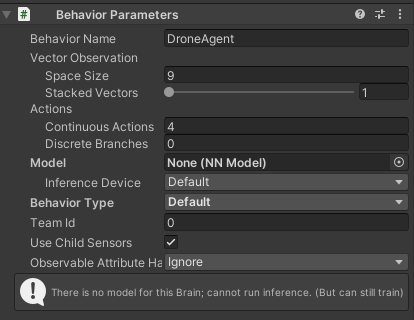
Using the ML Agents Toolkit, they provide a "Behaviour Parameters" component which allows users to set up agent parameters such as the number of observations and actions.
Agent Observations: Giving the Drone Awareness
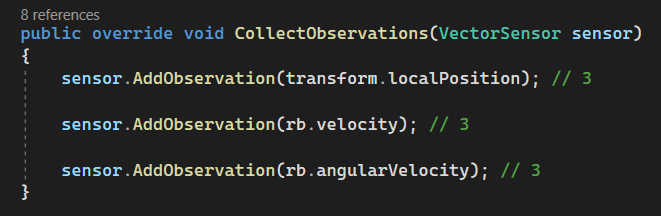
To make smart decisions, the drone agent needs to understand its current state in the environment. This is where the CollectObservations() method comes in - it is how we tell the agent what information to "observe" at each moment in time.
Here is the custom implementation I added to override the default CollectObservations() function:
Let's break it down
transform.localPosition (3 values)
This gives the agents its current position in the local space of the environment. It helps the agent know where it is relative to its starting point.
Why it matters: The agent needs to know its location to learn how to navigate or hover in place.
rb.velocity (3 values)
This provides the agent with its current linear velocity - how fast it is moving and in which direction.
Why it matters: If the drone doesn't know its speed, it can't learn how to slow down, stop, or move deliberately. Velocity is key to smooth, realistic movement.
rb.angularVelocity (3 values)
This gives the agent rotational speed - how fast it is spinning around each axis.
Why it matters: For a drone to remain stable in the air or rotate intentionally, it must understand how it is rotating at any moment. Angular velocity gives it that rotational awareness.
Total Observations: 9 Values
All this combined gives us a total of 9 continuous float observations.
Why does this matter for training?
This setup gives the agent just enough sensory input to understand and react to its motion in 3D space. With this information, it can learn to:
- Stabilise itself
- Move to target positions
- Avoid spinning out of control
Agent Actions: Turning AI Decisions into Drone Controls
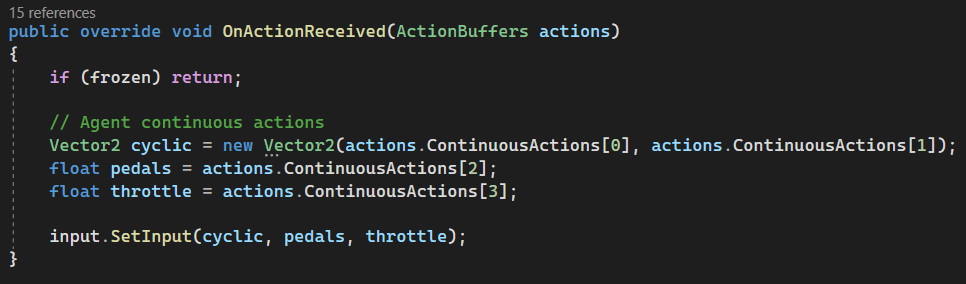
This function is where the brain of the drone (neural network trained by ML-Agents) sends it chosen actions back to the body - telling it how to move. Here is the code:
Let's break it down
When the ML-Agents framework chooses an action for the drone, it delivers it via an ActionBuffers object. This function takes that buffer and decodes the agent's decision into the drone controls that were previously set up.
Vector2 clyclic = new vector2(actions.ContinuousActions[0], actions.ContinuousActions[1]);
The first two continuous actions control the cyclic input, which determines the tilt of the drone.
- actions.ContinuousActions[0]: controls left/right tilt (roll)
- actions.ContinuousActions[1]: controls forward/backwards tilt (pitch)
Together, this vector2 gives the agent precise control over the drone's angle, allowing it to move in the horizontal plane.
Why it matters: This lets the drone learn to move in directions rather than just hovering in place. Think of it like nudging a joystick to fly forward or sideways.
float pedals = actions.ContinuousActions[2];
This third action is for the pedal input - it controls yaw, or the rotation around the vertical axis.
- pedals lets the drone spin left or right in place.
Why it matters: This is crucial for steering and orientation, especially when the drone needs to face or align with targets.
float throttle = actions.ContinuousActions[3];
This fourth action controls the throttle - essentially the upward lift or thrust.
- Higher throttle = drone ascends
- Lower throttle = drone descends or hovers
Why it matters: This gives the drone vertical movement control - without throttle, it can't fly.
Putting It All Together
Finally, all these inputs are bundled into a call to:
input.SetInput(cyclic, pedals, throttle);
This function passes the agent's control decisions to the drone's flight system. The physics engine then translates those inputs into actual motion - tilting, rotating, and flying.
Total Continuous Actions: 4
The drone has 4 continuous control channels:
- Roll (tilt left/right)
- Pitch (tilt forward/back)
- Yaw (Rotate)
- Throttle (ascend/descend)
This gives the agent full 3D control over how the drone moves.
Heuristic Control: Manual Input for Testing and Debugging
The Heuristic() function is a powerful feature in Unity ML-Agents - it allows manual control of the agent using real-time inout (like keyboard/gamepad). It is mainly used to:
- Test the environment
- Debug agent behaviour
Here is the code:
Let's break it down
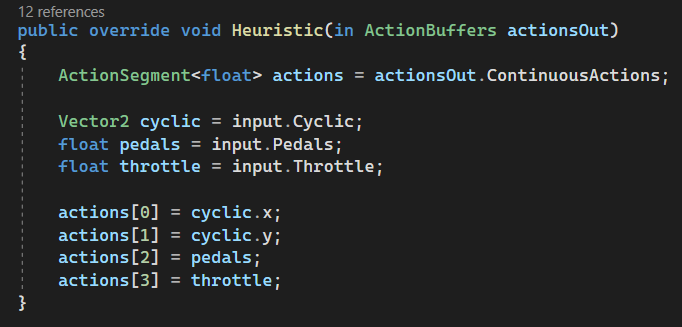
This shows overriding the Heuristic() method to send manual input values to the agent's actions - simulating what the AI would normally decide.
ActionSegment<float> actions = actionsOut.ContinuousActions;
This uses the continuous action buffer - the space where you will manually insert control values for the agent (just like the NN would during training or inference).
Vector2 cyclic = input.Cyclic
The cyclic input is fetched from the DroneInputs.cs, which controls:
- cyclic.x: roll (left/right)
- cyclic.y: pitch (forward/backwards tilt)
float pedals = input.Pedals
float throttle = input.Throttle
These grab the manual yaw (rotation) and throttle (lift) inputs from the DroneInputs.cs.
Writing the Inputs to Actions
actions[0] = cyclic.x;  // Roll
actions[1] = cyclic.y;  // Pitch
actions[2] = pedals;    // Yaw (Rotation)
actions[3] = throttle;  // Lift
This feeds the inputs directly into the agent's action buffer, meaning the user will be controlling the drone for this step.
RayPerceptionSensor3D: Giving the Drone "Eyes"
To navigate intelligently, the drone needs to see its environment, not just to understand its velocity or position. That is where the RayPerceptionSensor3D comes in.
This component acts like a 3D laser scanner, shooting out invisible rays in various directions to detect nearby objects based on defined tags. The sensor feeds this spatial awareness directly into the agent's observations.
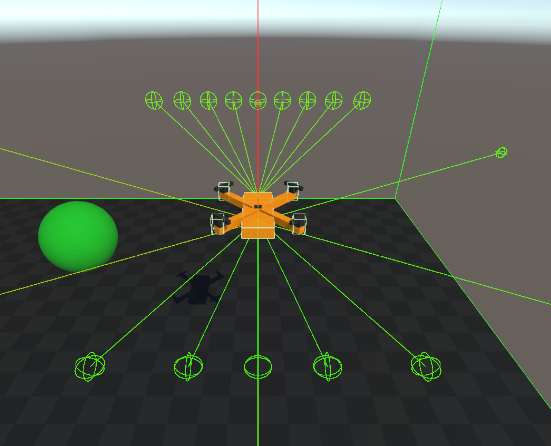
Ray Example
This shows one RayPerceptionSensor3D added to the agent.
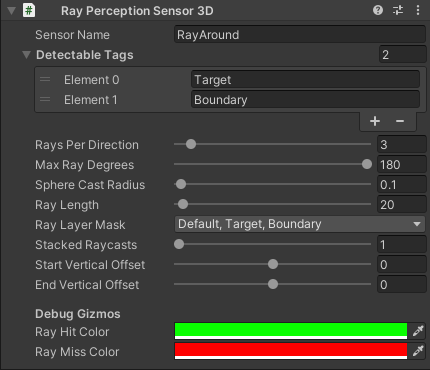
Here is how it is configured:
Detectable Tags: Target, Boundary
We define which types of objects the rays can recognise using tags:
- Target: Something the drone should approach.
- Boundary: A wall or obstacle that the drone should avoid.
The sensor will return values based on whether the rays hit these objects and how far away they are.
Ray Settings
Rays Per Direction: 3
This sends 3 rays in each direction, which helps create a spread pattern around the agent.
Max Ray Degrees: 180
This means the rays are spread out in a half-circle (180) around the drone in the horizontal plane, great for sensing what is in front, left and right.
Sphere Cast Radius: 0.1
Instead of a thin line, the rays are cast as spheres with a small radius, making detection more reliable for fast-moving or small objects.
Ray Length: 20
This controls how far the rays can see. At a distance of 20 units, the drone can detect obstacles or targets well in advance.
Adding Multiple Rays
Rays have been added around, in front, up and down.
How It Helps Learning
These rays are automatically added to the agent's observation vector. The agent learns:
- Where nearby targets and boundaries are
- How far away they are
- Which direction are they in
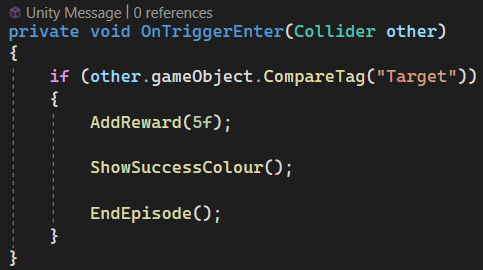
Reward Shaping
For collecting the target, I decided to give the agent a +5 reward, while hitting a boundary results in a -20 penalty. These values weren't chosen at random; they're shaped intentionally to guide learning.
Why +5 for Collecting a Target
The goal of the agent is to find and reach the target. A positive reward like +5:
- Reinforces successful behaviour and tells the agent, "This is what you should be doing".
- Encourages the agent to prioritise collecting targets over random exploration.
- Keeps the reward high enough to stand out against small incidental penalities.
Why -20 for Hitting a Boundary
On the other hand, boundaries are undesirable behaviour. A larger negative reward like -20:
- Strongly discourages the agent from flying into walls.
- Helps the agent learn faster by associating failure with a sharp penalty.
- Creates a strong contrast to the +5, helping the agent distinguish between good and bad decisions more clearly.
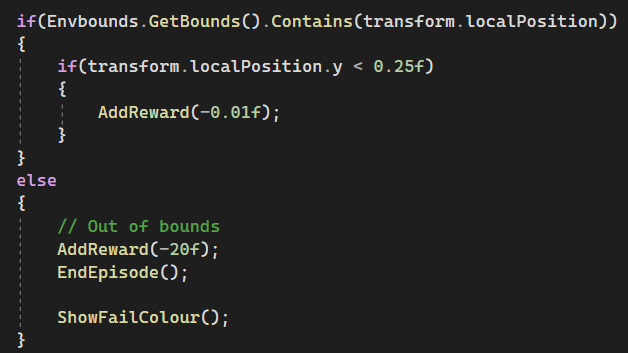
Negative Reward for flying too low
I have also given a very small negative reward when the agent's position is low to the ground. A negative reward of 0.01:
- Discourages it from flying too low to the ground.
- Encourages it to fly upwards and hover.
The Balance
The ratio between positive and negative rewards is critical. If the penalty isn't large enough, the agent may learn to be eratic and collide into walls without caring. If it's too large, the agent may become overly cautious and never explore as it'll be too afraid to make decisions and potentially get a negative reward.
Leave a comment
Log in with itch.io to leave a comment.